Choosing Glass or Acrylic for Your Magic Mirror
If you’re planning on building your own Magic Mirror, the material you use plays an important part in how your Magic Mirror looks. Different styles and types of Magic Mirrors require different materials and some materials are more expensive than others.
You have two options with your Magic Mirror: glass or acrylic. Glass is more expensive than acrylic, but can give better results. Acrylic can flex and slightly distort the reflected image, which may be unnoticeable on small Magic Mirrors, but a disaster on large bathroom-sized mirrors.
The right option for you depends on your budget, the size of the Magic Mirror you want to build, and the style of your mirror.
Let’s look closer at the different options you have so you can make the right choice for your Magic Mirror.
Glass vs Acrylic: Cost
The amount of money you want to spend on your Magic Mirror might tell you which material to use. As I cover in my article on the costs of building a Magic Mirror, there can be a massive difference in cost between a glass Magic Mirror and an acrylic Magic Mirror.
There are also two different options for glass. The most expensive option is to buy a pane of two-way glass. This is when the glass is manufactured with the reflective two-way film.
These two-way mirrors are incredibly expensive, but give the best possible quality for your Magic Mirror. The other option is to buy a regular pane of glass, then stick two-way film onto the glass.
It’s much cheaper to buy regular glass and add film to it, but the results won’t be as good as a proper two-way mirror.
Adding film to glass is a very good approach. Acrylic can produce too much distortion and may not look as good. Getting a proper two-way mirror manufactured is a much more expensive option.
So adding film to glass is a way you can get a good looking mirror at a reasonable cost.
Bottom line: acrylic will be cheaper than glass, but acrylic only looks good on small to medium sized Magic Mirrors. The larger your Magic Mirror, the more acrylic sheets will distort the reflected image. If you’re planning on building a large Magic Mirror, use glass.
If you’re planning a small to medium sized Magic Mirror, pick the best option that fits your budget.
Comparing Glass and Acrylic
If you’ve been searching on Google for examples that compare glass and acrylic Magic Mirrors, you’ve probably seen photos like this one:
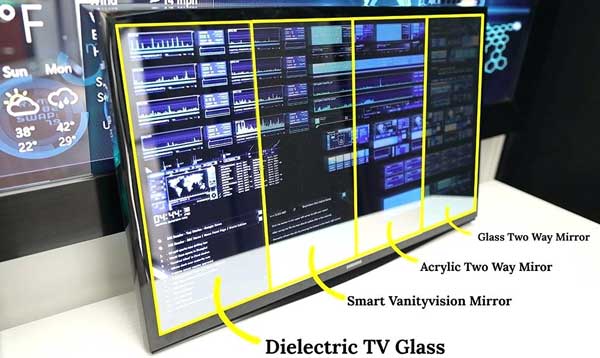
At first this type of direct comparison looks really helpful. You can clearly see there’s a big difference between some of the above panels. A quick glance at the above photo and it should be obvious which panel you should use for your Magic Mirror.
Glass looks terrible when compared to acrylic, which both look terrible against the other two options. But there’s a flaw in this type of comparison. The brightness of the display coming through the glass is only one part of a Magic Mirror. The other part is the reflection quality.
Can you tell from the above photo which panel gives you the best mirror-like finish? Not at all.
Be wary of these type of comparisons. The only places I’ve seen comparisons like this is from websites that sell ‘special’ panels designed for Magic Mirrors. It’s no surprise that their most expensive options always look the best in these comparisons.
These companies want to sell you their expensive proprietary materials, so of course they will make sure they look the best in comparisons.
While the above photo makes it look like there’s a huge difference between glass and acrylic, there’s actually very little difference between glass and acrylic. It’s not the material that makes the difference, it’s the reflective film.
The differences you see in the above photo (or similar comparison photos) are due to the different qualities of the reflective films used on the back of each panels. If the same film was used on all of those panels, the differences between them would suddenly disappear.
The above photo might be comparing a 70% reflective glass against a 50% reflective acrylic. In other words, not a fair comparison.
The point to take away here is that these type of comparisons are misleading. What might look like the best option in the above photo may be overkill for your Magic Mirror. The worst looking panel in the above photo might be perfectly fine for your needs.
Don’t be fooled by comparisons like the above photo.
Pros and Cons of Using Acrylic For Your Magic Mirror
The obvious benefit, as mentioned above, is that acrylic is cheap and easy to use. You can easily buy a sheet of two-way acrylic, slap it in a frame and mount your display.
You can even cut acrylic sheets fairly easily to get the perfect size for your Magic Mirror.
Another benefit to using acrylic is the weight. Acrylic sheets will be far lighter than glass sheets. Glass will always be far heavier than acrylic.
A downside of using acrylic is when it comes to larger Magic Mirrors. Acrylic can warp and distort the reflected image. Even a slight pressure from the display or frame can be enough to turn your Magic Mirror into a fun-house mirror.
In smaller builds you may not notice any distortions at all. As the size becomes larger, distortions become far more noticeable. Using an acrylic sheet for a large bathroom mirror would end in disaster.
Another downside of using acrylic is if you want to build a borderless Magic Mirror. Acrylic sheets aren’t suitable for borderless Magic Mirrors. The edges will look terrible and trying to mount an acrylic sheet as a borderless mirror will create horrible distortions.
If you don’t plan on building a borderless Magic Mirror this won’t be a problem. But if you’re considering a borderless Magic Mirror, keep this in mind.
Bottom line: acrylic is cheaper and allows you to cut it to the exact size you require. The downside is it can warp or distort and doesn’t look good as large mirrors.
Pros and Cons of Using Glass For Your Magic Mirror
Glass Magic Mirrors can look amazing. When the display is off, they can look indistinguishable from normal mirrors. While you might not be able to notice any difference between a small glass Magic Mirror and a small acrylic Magic Mirror, the differences will become obvious with larger mirrors.
One of the reasons why glass Magic Mirrors can look so good is because of the strength of glass. Glass gives a nice flat surface that won’t warp or distort the reflected image. For large Magic Mirrors this is important as you will notice any warping.
A great benefit of glass is it gives you the option of going borderless.
A downside of using glass is the weight. Larger sheets of glass need to be produced thicker for added strength. Having a thicker sheet of glass can add a lot of weight.
Not only do you want to make sure you build a frame that can properly support that weight, but you need to be extra careful when mounting the mirror on the booth structure. The last thing you want is for a large sheet of glass to come crashing down on someone.
Bottom line: glass is strong and can give fantastic results when used for Magic Mirrors. Larger Magic Mirrors should use glass to avoid warping or distortions. The downside is glass is harder to work with, weighs more, and costs more.
Choosing The Right Material For Your Magic Mirror
If you’ve read through all of this article, you should have a good idea whether acrylic or glass better suits your needs.
Here are a few main points to help you decide which is best for your Magic Mirror:
- Smaller mirrors can use glass or acrylic without much difference in quality
- Medium sized mirrors tend to look better with glass, but acrylic can still look good if the frame is built properly
- Large Magic Mirrors look best when using glass
- Acrylic is far cheaper than glass and can be cut to size as you need
- Acrylic can warp and distort if any pressure is applied, so try to use a thick sheet
- Glass can add a lot of weight to your Magic Mirror, so be extra careful building your frame and mounts
- If you want a borderless Magic Mirror, use glass
Webcam or DSLR, Which Should I Use?
This is one of the most frequent doubts among our clients. The answer is: it depends on your goal. As our priority is quality, we choose and only use professional cameras (DSLR) in all events.
There are advantages and disadvantages to using each one, so you need to weigh each of the factors to make a decision.
Webcams:
Pros:
- They are more practical and lightweight
- No need for a battery: just plug in the USB, and it’s ready to use
They are cheaper, and obviously, in case of replacement, the cost is lower
Cons:
- The quality may be lacking, even when using high-definition webcams like Logitech C920, C922, C920e
- Normally requires a computer with a Core i3 processor. Any configuration lower than this may result in slow image transmission
Professional Cameras (DSLR):
Pros:
- The captured photo quality is undeniably better than webcam photos. Your client will love receiving the photos after the event!
- Works well on more basic computers like Dual-Core or Core 2 Duo, for example
Cons:
- Requires basic knowledge of handling (adjusting zoom and focus, for example)
- They are more expensive, and obviously, the replacement also comes at a higher price
- You always need to keep at least 2 charged batteries for a 4-hour event, for example. However, this problem can be solved by using a battery eliminator
Other Factors to Consider
Lighting and pose size will also affect the final printed photo. The better the lighting, the higher the quality of the final photo. Normally, the more poses, the less space available, so they tend to be smaller. The smaller the image, the less noticeable the difference in quality will be. In any of our programs, you can set the size of the poses according to your goal!
A Special Case: Magic Mirror
If you are setting up a magic mirror and want to do it in the best possible way, the only option to consider for capturing photos is a professional camera. For 2 reasons:
1. The camera offers lighting adjustment (through the shutter opening, for example), which is crucial on the mirror since the camera is behind the mirrored film, making “visibility” more limited.
2. It can communicate with an external flash (by wire or hot shoe), which is your inseparable friend at this moment.
The webcam is out of the question because it does not have the mentioned characteristics of DSLR. But it can still be used if you don’t mind compromising the “magic” of the mirror by making a hole in it or using the webcam outside the structure (not very elegant, right?).
Still undecided? Contact us, and we’ll help you 🙂
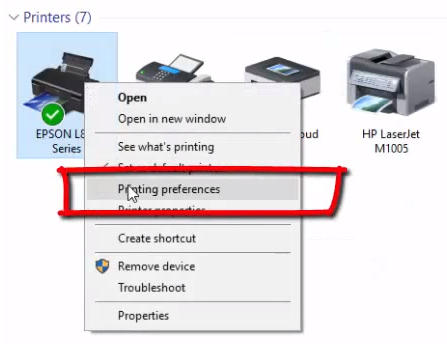
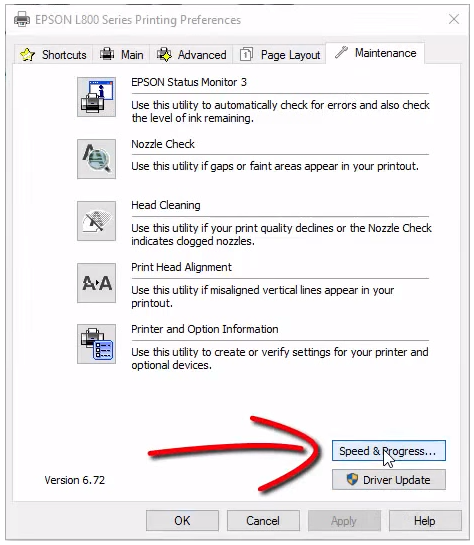
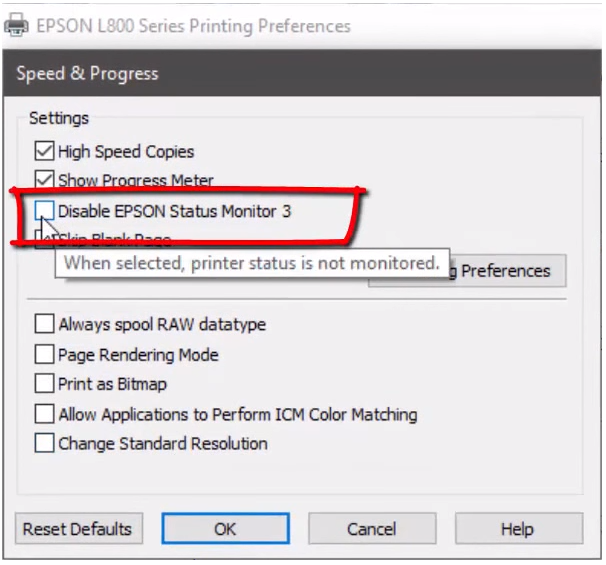
Epson Print Notifications: How to Disable?
Do you know those annoying Epson notifications that keep popping up when the printer is low on ink or when something is sent to print? You can get rid of them!
Epson Ecotank L380 / L120 / L395 / L1300 / L455 / L805 / L495 / L4160 / L800
Access the Windows control panel > Printers > Right-click on your Epson > Print Preferences > “Maintenance” tab > Speed and Progress > Disable “Epson Status Monitor 3.”
The Top Five Printers for Instant Photos
The question of which is the best printer for my instant photo business (whether it’s a photo booth, silly photo, or Instagram) is a popular topic that is always a point of discussion among entrepreneurs in this field. Depending on the design of your structure and many other factors, opinions can vary significantly. For some, choosing a photo booth printer can be a bit challenging. However, with the help of this article, you can find the right printer for your needs.
Every day we receive many emails asking “what are the best photo booth printers?” The answer is: it depends on your goal.
The factors to consider in your choice should be:
- Who is your target audience, and how much do you intend to invest: are there customers in the region willing to pay more for a differentiated quality service with high-quality photos?
- Support from the dealer and the manufacturer. Do you have someone to rely on if the equipment has problems? Are there options in your region?
- Durability: sublimation (thermal) technology is extremely reliable and robust;
- Convenience: would you mind having to change paper constantly during an event, or does that not matter?
When advising photo booth owners on purchasing photo printers, it is helpful to base ourselves on the terms “performance” and “economy“. Why? Printers in the performance category, as I listed below, are very different from printers in the economy category. High performance printers have some similar characteristics, such as speed, convenience, and a higher price. Economical printers tend to be slower, have lower image quality, and require a bit more labor to change paper since they support a limited amount of paper in the feeder.
High-Performance Ones
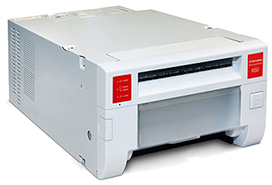
DNP DS RX1
This model remains unique in weight and size in its class. This unique personality makes this printer a popular choice among photo booth builders. Its printing capacity is impressive, considering it can produce 700 copies of 10x15cm (4×6 inches) on a single roll before it needs to be reloaded. Generally, printers with this type of capacity are bulky and heavy; however, the DSRX1 weighs only 13 kg!
SINFONIA CS2 Shinko S6145 (Alfa Olmec)
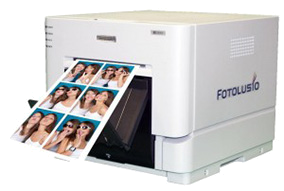
The world’s smallest and lightest professional photo printer! The coolest thing is that print quality is not sacrificed due to its size! Its external structure is very durable, considering the weight of the printer. This is the perfect choice for photo booth projects with limited space. The CS2 photo printer is currently one of the best cost-benefit options in the market.
Mitsubishi CP-K60DW-s
Mitsubishi designed this model to be used as a photo booth printer. It’s not the fastest printer, but it’s fast enough and has some really cool features. It is compact, so it is great for small photo booths. Much like its older sister, the CP70, the K60 is solid with a metal body. Front loading makes media replacement a very simple operation. One of the most interesting features of this printer is that it can make a square print of 6×6 inches. This feature has been popular with event photographers and is now starting to catch on with some instant photo companies that allow users to offer Instagram-style prints.
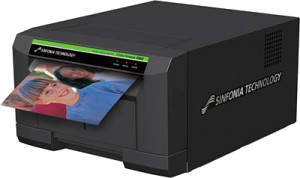
HiTi 510L
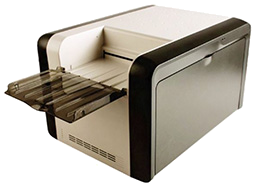
A photo printer with a unique profile. For those who like to have a “compartment” to catch prints, this printer fits the profile. When prints are ejected from the printer, unlike the other printers shown here, the print falls on the top of the printer body (see the image on the right). Some builders also prefer the ribbon load with this printer as the ribbon is housed in a single cartridge, which conveniently fits into place with little effort.
DNP DS40
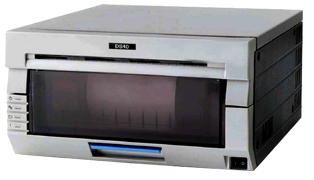
If you are willing to spend extra money on a product that provides extra features, the DNP DS40 printer is an excellent choice. Photo booth print flows typically do not require the speed (or components) that this printer provides. With the DS40, you can also print in social media sizes and with perforations, giving you the opportunity to create new products for your clients.
Photo Samples
If you have read this article and still have doubts about the printer, I suggest contacting the supplier and asking for print samples! They are a great way for you to assess the quality of each of the printers firsthand.
The Economical Ones
Epson L375
Epson L800
HiTi S420
Canon Selphy
We will provide more details about the ones listed above soon, okay? 🙂
See How People Are Beating the Crisis with Boldness
Prosperity in times of crisis is also possible. Despite the hardships that Brazilians have faced in recent years, the economic crisis has had a positive effect on the service sector, encouraging entrepreneurship. Whether unemployed or dissatisfied with the current job, starting your own business can be the way out of a difficult financial situation and even the opportunity to increase monthly income and achieve satisfaction in a new career.
For this, a little talent and boldness are needed. Depending on the area of activity, large initial investments are not necessary, but if the entrepreneur works hard, there is the possibility of growing quickly. Remember, every great business was once small.
Check out some examples of how people are beating the crisis and get ideas to help you also turn this phase into an opportunity for success.
Examples of How Crisis Drives Entrepreneurship
During the great American crisis of 1929, Charles Darrow, like many other citizens, could not find formal employment and lived on small odd jobs. In the intervals between these activities, he created the board game “Monopoly,” which is still a success worldwide.
After the end of the Second World War, cocoa, which had been devastated during the conflict in Italy, had disappeared from the country’s fields. This prompted a local confectioner to create a sweet option with other ingredients and just a hint of cocoa: this is the origin of the hazelnut cream, now world-famous Nutella, and a successful business, the Ferrero Group.
Cases like these demonstrate that the crisis can also have a positive side. Looking at the scenario with creativity and boldness, it is possible to create opportunities and overcome difficult times.
Formalization to Overcome the Crisis
Today, in the country, one of the options found by Brazilians who are overcoming the crisis is to become an individual microentrepreneur – the country already has more than 5 million of them.
In force since 2009, the law of the Individual Microentrepreneur (MEI) allowed the worker known as informal to become a legalized entrepreneur, with a CNPJ. To be classified, the entrepreneur cannot be a partner in another company or an employee receiving more than the minimum wage or the category floor.
The main advantages of leaving informality and becoming an MEI are that entrepreneurs can issue invoices and contribute to social security, thus having the right to sickness benefits, maternity leave, and retirement. In addition to reducing taxes and bureaucracy, the microentrepreneur also has lower costs with employees, access to a credit line in banks, and free technical support from Sebrae.
The list of activities and professions allowed by the law is extensive, as long as your turnover does not exceed R$ 60 thousand annually, which corresponds to R$ 5 thousand monthly. As an MEI, you can offer services that do not require large initial investments, such as craftsman, maid, and animal caregiver.
Overcoming the Crisis: Ideas for You to Start
To help you overcome the crisis, check out some ideas for activities that can be started with low investment and are allowed by the Individual Microentrepreneur law.
Photographer
Using a photo booth or photo booth, you can offer photography services for documents or even use them during events – a creative and fun way to record the presence of guests at a party and a profitable business for you.
There are also other services whose investment is a little lower, such as the Crazy Photo and printing via hashtags (via Instagram).
Contact our team if you want to know more about it 🙂
Credits: Alumipac