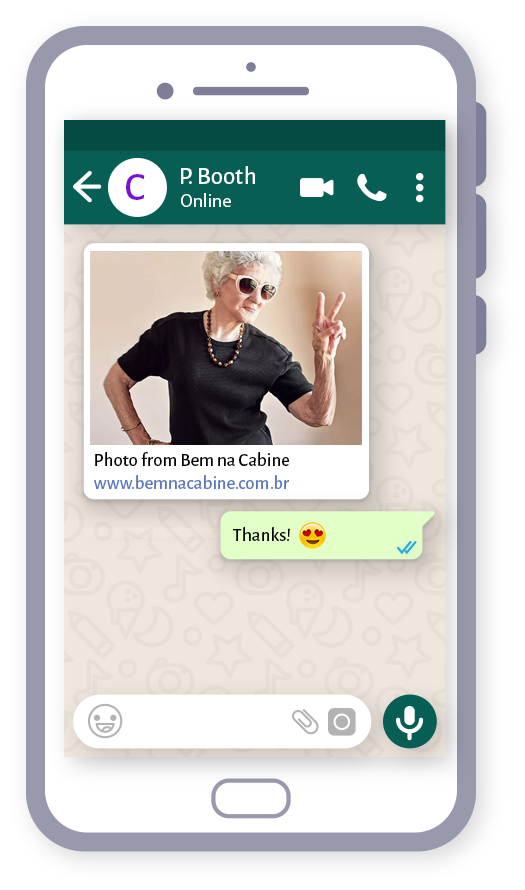
Sharing photos on Whatsapp
See more...
(Applicable to programs: Magic Mirror or Photo Booth)
One of the great features of our programs is that they allow photos to be directly sent to a desired WhatsApp number.
Step by step:
* Open the program, go to the Settings > General menu, and make sure the Country Code is correct.
|
Country
|
Code
|
|---|---|
| Argentina | +54 |
| Azərbaycan | +994 |
| Bolivia | +591 |
| Brasil | +55 |
| Canada | +1 |
| Chile | +56 |
| Colombia | +57 |
| Ecuador | +593 |
| France | +33 |
| Ελλάδα | +30 |
| Kalaallit Nunaat | +299 |
| Guatemala | +502 |
| Italia | +39 |
| Lietuva | +370 |
| México | +52 |
| Nederland | +31 |
| Paraguay | +595 |
| Portugal | +351 |
| España | +34 |
| United Kingdom | +44 |
| United States | +1 |
| Uruguay | +598 |
* Go to the Event > Edit Event menu, make sure Share on WhatsApp is checked. Then save the settings.
* Start capturing, and at the end of the session, click the WhatsApp sharing button. On the next screen, enter the WhatsApp number where you want to receive the photo. Some examples:
– For the UK: enter the number in the format 7498035065
– For other countries, usually, you just need to enter the phone number, as there is no area code like in Brazil. However, there are some exceptions, such as countries that are part of the “Member countries of the North American Numbering Plan (NANP)”. In these cases, each country has, in addition to the country code, a 3-digit area code (except for Canada and the United States), as follows:
+1 – Canada or United States
+1 340 – United States Virgin Islands
+1 670 – Northern Mariana Islands
+1 671 – Guam
+1 684 – American Samoa
+1 787, 939 – Puerto Rico
+1 242 – Bahamas
+1 246 – Barbados
+1 264 – Anguilla
+1 268 – Antigua and Barbuda
+1 284 – British Virgin Islands
+1 345 – Cayman Islands
+1 441 – Bermuda
+1 473 – Grenada
+1 649 – Turks and Caicos Islands
+1 664 – Montserrat
+1 721 – Sint Maarten
+1 758 – Saint Lucia
+1 767 – Dominica
+1 784 – Saint Vincent and the Grenadines
+1 809, 829, 849 – Dominican Republic
+1 868 – Trinidad and Tobago
+1 869 – Saint Kitts and Nevis
+1 876, 658 – Jamaica
Ready! The photo will be sent to your WhatsApp shortly.
It’s worth noting that photos are sent with our logo. If you intend to remove it and use your own, you need to top up your account.
After purchase, you need to wait up to 24 hours for your credits to be loaded. We will send a confirmation email.
There are two sharing options: using our shared account on WhatsApp or through your own WhatsApp account. In the second case, the client will need to click the link sent by email and scan the QR code with the WhatsApp app they want to use as the sender for sending the photos.
Once this is done, your photos can be shared with your own brand or advertising.
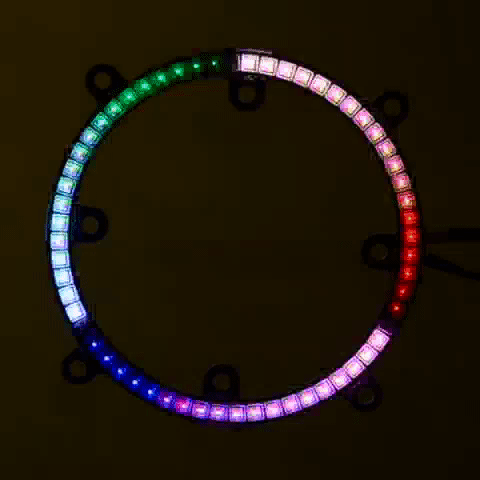
How to use the LED ring
See more...
(Applicable to program: Magic Mirror)
One of the features that has been increasingly used for the Magic Mirror is the LED ring. The goal of this little friend is to attract the attention of guests so that they look at the right place (the camera!) when the photo is taken. Since electronic equipment, including the camera, is all hidden behind the mirror/mirrored film, it’s natural for guests to be a bit lost about where to look when it’s time to say “Cheese!”
The Magic Mirror program (Unofficial Software – Beta) currently integrates with two types of rings:
- Arduino with 24 or 40 lamps (models: Leonardo, Mega 1284, Mega 2560, Micro, Nano R2, Nano R3, Uno R3)
- Booth Junkie
It is worth noting that this LED ring module is still in the testing phase and therefore should not be officially used at your events.
If you prefer convenience and are willing to spend more, some companies like Booth Junkie sell the ready-to-use physical structure, which basically consists of a plastic housing with the LED attached on the inside.
If you prefer to spend less, you can buy the products separately and assemble them yourself, following the tutorial below (Arduino).
Arduino – Do It Yourself
Items you need to buy/own:
- LED ring with 24 or 40 lamps. The most important thing here is to check the size of the ring/front barrel of your camera, as the LED ring needs to be larger than it.
- Red, Green, and Blue pins
- Soldering machine
- Arduino R3 UNO board + USB cable. Make sure the USB cable is at least the length of your camera’s USB cable, as they will always be together.
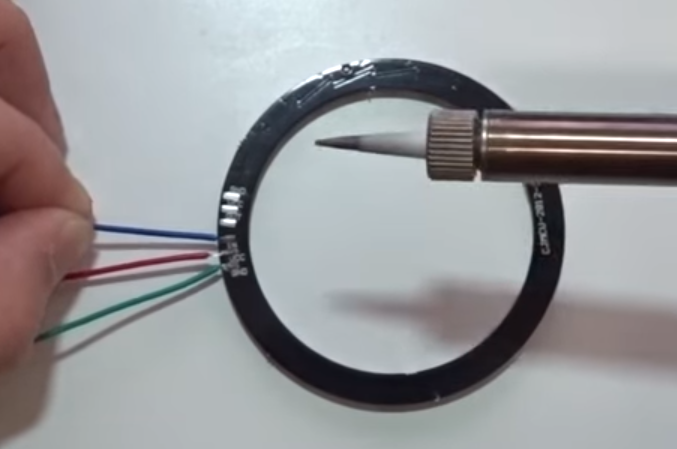
1. First, let’s solder the 3 pins:
Blue to IN
Red to GND
Green to VCC
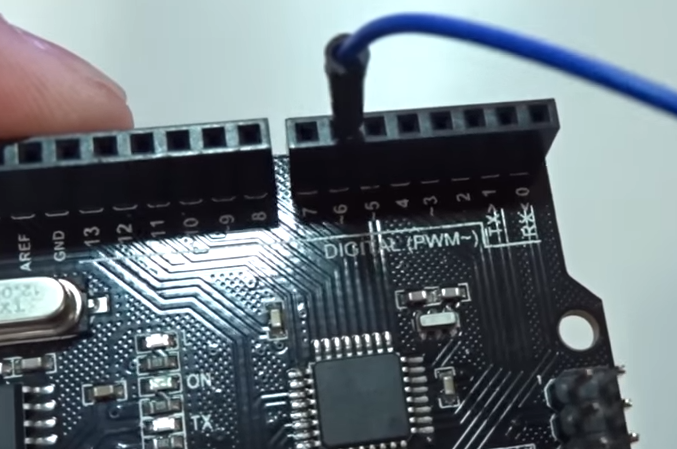
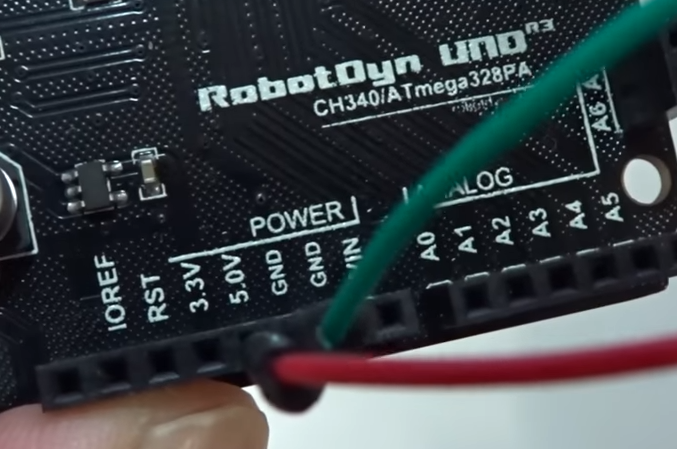
2. Then, connect the pins as follows:
VCC to the 5.0V socket
GND to the GND socket
IN to any digital socket
There you go, we’ve finished the hardware part!
3. Connect the LED ring to your computer’s USB port or even a USB hub. At this point, Windows will display a window near the clock, indicating that it is installing some drivers. Wait until it informs you that the drivers have been successfully installed.
4. Now we need to manually install the Arduino drivers because the drivers installed by Windows are not sufficient. First, download this zip file, and after downloading, unzip it into a folder named DriversArduino.
Navigate to “Device Manager” (Start Menu > Control Panel > Hardware).
In the case of Windows 7, your Arduino model will usually be displayed in the “Other devices” group.
In Windows 8 or 10, it will be displayed in the “Ports (COM and LPT)” group, but if you see more than 1 item in this group, you need to identify which one belongs to the Arduino. To do this, note the items in the list and then remove the Arduino from the USB. Note that the list will be updated automatically, and this time it will only show the other devices.
What didn’t appear in the list belongs to the Arduino. Connect your Arduino back to USB, wait for the list to be updated, right-click on the item referring to the Arduino, and go to Update driver > Browse my computer for driver software > Browse. At this point, locate the DriversArduino folder mentioned above > OK > Next.
A new window will appear. Click Install. Then, Windows will inform you that the drivers have been successfully installed. Click Close.
5. Now we need to check if the Magic Mirror program will recognize the equipment. To do this, open the program and go to the menu Settings > General > LED:
In the Enabled field, click Yes, and check if next to this field a message is displayed (Arduino Detected). If positive, proceed to fill in the following fields:
Arduino = (select your model)
COM Port = (Detect automatically)
Number of ring lamps = (select how many lamps)
In the next fields, you will set when you want the ring to take action: before the photo is taken or during the countdown or both.
For both cases, you can choose from a list of effects (Propeller, Carousel, Roller Coaster, or Lights Explosion).
For the countdown, there’s an extra effect (Circuit) where you can set the color that will be displayed every second.
Click Save and wait for the program to restart (this may take about 30 seconds, as the program will communicate with Arduino to save the settings).
That’s it! Now, test it out and see how it works.
From now on, most guests will be drawn to these cool LED ring effects and will naturally look at the camera (without you asking!), resulting in the best photos!
Don’t have a printer yet or don’t want to print?
See more...
(Applicable to programs: Magic Mirror or Photo Booth)
In general, there are two situations where you don’t have a printer: you are still in the discovery phase and, for now, only want to test our programs, or the service you will provide to your end customer includes only the delivery of digital photos and/or sharing them.
In either case, it is necessary that you install at least a virtual printer. The process is relatively simple.
To do this, access the Control Panel (on Windows) > Printers and add a new local printer on port LPT1. From the list, choose the HP Photosmart A710 series (for Windows 7) or HP Photosmart 5510 series Class Driver (for Windows 8 or 10) and follow through to the end.
When asked if you want to share, select No. After that, right-click on the newly created printer and go to “Printing Preferences” > “Advanced” button > Paper Size: A6.
Frames – create new or use existing
See more...
(Applicable to programs: Magic Mirror or Photo Booth)
Scenario 1:
Your customer hasn’t given any detailed instructions on how the frame disposition should look like, so you may be free to pick some of the existing frames offered by the program.
All you need to do is go to the Change Frame screen, pick your desired frame and click Import image and select the desired background image.
Scenario 2:
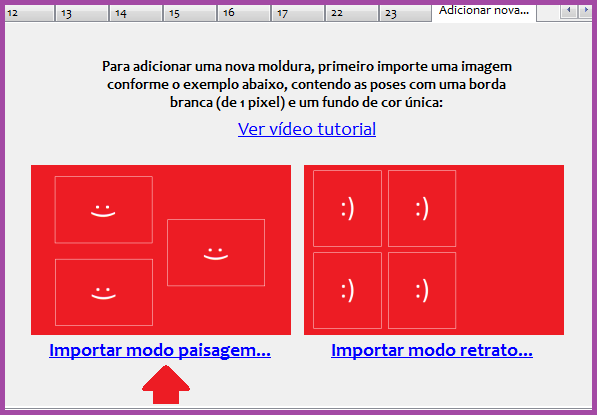
Your client sent you a frame model they found interesting, saying: “I want something exactly like this or similar,” with 3 poses, and they need to be arranged like this:

The next step is to check if the program has a frame where the poses are in these positions. No? Then you need to create a new frame. For that, you need to generate what we call a template. Note that the template is a “raw” image, with a single-color background and rectangles representing the exact position of the poses in the background image above.
To see the details better, download here the ZIP file containing the template and the background.

The template prerequisites are:
- The image must be in PNG format
- The aspect ratio between width and height must be exactly 1.5 (for 10×15 photos). Example: width = 1500px and height = 1000px
You can create the template in any graphic editing program, but the most recommended is the old Paint from Windows. This is because the lines of the rectangles need to be 100% clean; some graphic editing programs generate a “smoky” effect around the lines, and that is not what we want.
With the template ready, access the “Change frame” screen, click on the last tab “Add new,” and choose the orientation to import the template. In our case, the poses need to be in landscape. Click on Import landscape mode and look for the red template we generated above:
The program will indicate a successful import and generate a new tab for the new frame (before the “Add new” tab):
Next, you need to edit the template in a graphic tool (Photoshop, Corel, Illustrator – or if you don’t have any, you can use this online tool www.vectr.com) and add everything necessary (images, texts, etc.), and then save it.
>
After that, go back to the program and, in the newly created frame, click on Import image… and locate the background image you just created. Done!
If you want to import an image in portrait mode, the only thing you need to do beforehand is make sure the images are rotated to the left, 90 degrees.
Click on Import portrait mode, and from there, just follow the previous steps.
 >
>
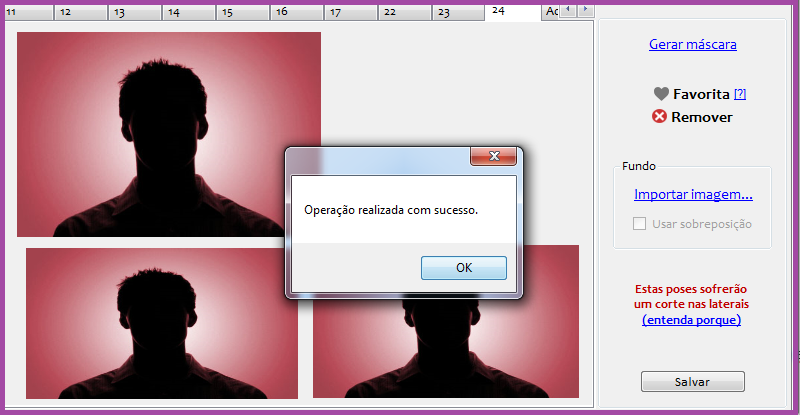
Scenario 3:
Your client only gave a general idea of how they want the frame, without providing more details: “Oh, I would like something simple with a cherry background and a drawing of a couple.” In this case, you can follow two paths:
- You liked a model that the program already offers: access the “Change frame” screen, choose a frame you like, and click on Generate mask. This will generate a template that you will use as a reference for the pose positions. Edit it in a graphic tool (Photoshop, Corel, Illustrator – or if you don’t have any, you can use this site www.vectr.com) and add everything necessary (images, texts, etc.), and then save it. After that, go back to the frame you liked, click on Import image… and locate the background image you just created. Done!
. - You want to create a frame from scratch, different from the frames that the program offers, based on the client’s idea. Watch the video below:
.
How to Print Photo Strips
See more...
(Applicable to programs: Magic Mirror or Photo Booth)
Since the creation of the photo booth (as shown in the Curiosities section), photo strips have been the precursors of this worldwide trend, which is instant photography.

Even today, it is still trendy, mainly because it takes up less space and also serves as a bookmark for book lovers.

But where to buy the paper or film for this type of photo? The answer is simple: it doesn’t exist. The secret behind the photo strip is that it is nothing more than a 10x15cm photo cut in half, resulting in 2 photos of 5x15cm (or 2×6 inches).
This cut can be done in two ways: manually or through the printer. Manual cutting can be done with a guillotine or scissors, for example. On the other hand, cutting by the printer is done automatically.
I won’t go into details about manual cutting because it’s relatively simple, right?
Regarding printer cutting, you should check with the manufacturer if it provides this option. Newer thermal/sublimation printers (from the last 4 years) offer this option. Some examples are: Alfa Olmec CS2, Fujifilm ASK-300, DNP RX1, HiTi P520L, P150L, among others.
If the printer offers this function, the next step is to enable it. Taking the example of the DNP RX1 printer, this can be done through the Control Panel > Devices and Printers > Right-click on your printer > Printing Preferences > Advanced Options:
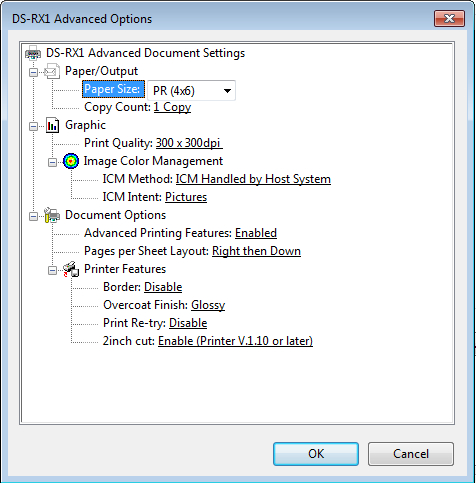
The key fields here are:
Paper size: 4×6 inches / 10×15 cm
2-inch cut: Enabled
Click OK and OK again.
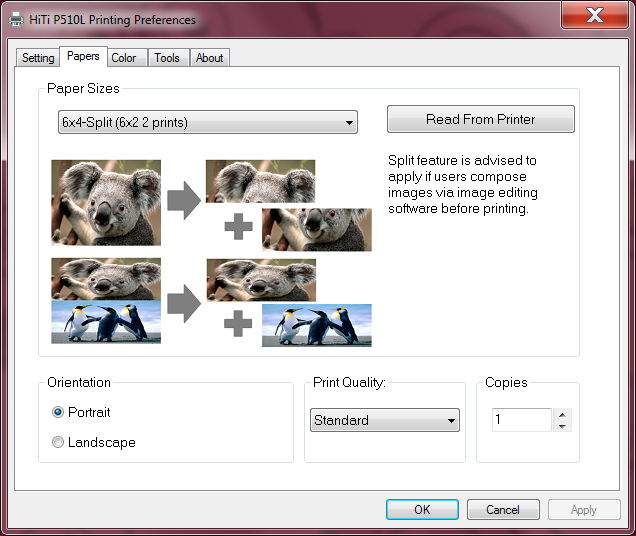
For the HiTi P510L or P510S:
Some HiTi P510S printers come with a CD with older drivers that do not include the option for strip cutting. Fortunately, there is a simple solution for this – go to the HiTi website and download the correct driver for your operating system and install it on your computer. (Important: on Windows 7, make sure the printer is not connected and turned on during the installation of the printer driver). After installing the driver, you will see that there is an option for “6 × 4 Split (6 × 2)” – see the image below. Select this paper size to print two 5x15cm strips.
After this, the next step is to access the program, go to the Settings > Printing menu, note the current values, and then set the values below (also note them down, as they are useful for
specific use of the photo strips):
Portrait
0.18
0.18
0.15
0.08
3.9
4.2
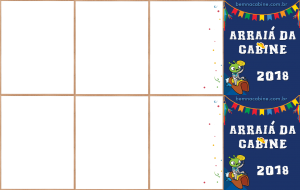
After this step, on the frame selection screen, choose between frames 6 or 7. If you choose 7, you can import this background image as an example:
Still on the frame selection screen, check the “Use Overlay” option.
You can also download the Photoshop file to edit it as you wish.
All set! Start the photo session and let the program and the printer take care of the rest.
At the end of the session, the printer will generate 2 photo strips.
White borders issue?
See more...
(Applicable to all programs)

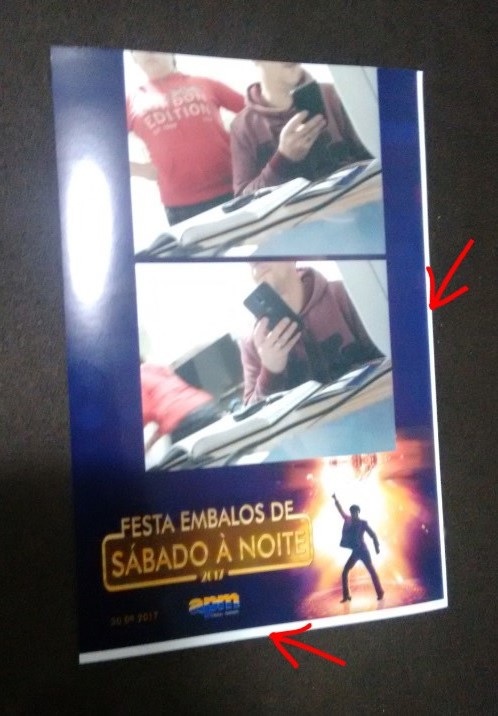
Because each printer has a different print setting, the printed image may not fit neatly into the frame, and you will notice this through white borders that will appear on the sides of the printed photo. You must calibrate in the Settings > Printing menu. Here are the items and what each one means:
Photos Top Margin (cm): how far the captured photos will move down, in cm
General Left Margin (cm): how far the background and photos will move to the right, in cm
Upper Margin Cut (cm): used for strips only. It means how much the lower photos will fall in relation to the cut, in cm
% Background increase (A): how much the background image height will be stretched, as a percentage
% Background increase (L): how much the background width will be stretched, as a percentage
In the case of the photo printed above, the best way to get rid of the white borders would be to decrease the top margin by at least 0.6 (the photo will go up) and increase the overall left margin by at least 0.8 (the photo will move farther to the right).
If you notice that, even when moving the photo, another edge appears on the opposite side, first adjust the settings above so that the photo touches the left side (covering the left edge) and also touches the top corner (covering the top edge). Then, increase the values of the % Background Increase (H) and % Background Increase (W) fields. For example, you can increase by 0.8 (if the current value is 4.2, change it to 5.0).
Once you have a perfect set of settings, you should write them down and associate them with the printer you used, because if you format your computer or reinstall the program, simply put them back into the program.
Important note for some printers such as Epson L380 / L120 / L395 / L1300 / L455 / L805 / L495 / L4160 / L800: a big white border still appears?
This can caused by your printer margins, and the only way to print up to the edge of your page is a feature called ‘borderless printing’. Annoyingly not all printers have borderless printing, so there’s no guarantee you’ll be able to do it. The easiest way is to Google your printer model and find it on the manufacturers website. Check the spec or feature list for borderless printing.
Otherwise go into your printer settings (accessible when you go to print) and select ‘Preferences’ or ‘Advanced options’. Somewhere in these options you’ll hopefully find the option to allow borderless printing.
Instagram Hashtag – How to use it
See more...
Before we dive into the explanation of how to use our program, it’s important to know how to create a hashtag on Instagram.
The Instagram Hashtag program operates in 2 different modes:
- Automatic: photos will be printed automatically as soon as they are posted (1 copy per photo)
- Manual: you can choose which photos to print and how many copies
It can perform 2 types of printing:
- 4×6″ (10x15cm = A6)
- Alike pictures 4×3″ (2×7,5cm) – Polaroid style
Requirements for the software to work:
- Computer with Windows operating system (7, 8 or 10) and the Instagram Hashtag program installed;
- Mobile phone with Android or IOS operating system and Instagram program installed;
- Printer that performs 4×6″ format printing (also known as 10X15cm or A6);
- Both computer and mobile phone must be connected to the Internet;
Having this done, open the Instagram Hashtag program. In this particular tutorial, we will cover only the automatic mode of operation. Both modes are relatively simple and intuitive. The main differences are:
- In the manual mode, photos will only be printed if you wish. In addition, you can set the number of copies (in the automatic mode, 1 copy is printed for each photo posted)
- In the manual mode, there is an extra field on the main screen where you can filter photos by the user who posted them
- In the manual mode, the program is not constantly looking for new photos, you need to manually click “Upload more photos” now and then
Go to the settings menu (gear icon) > General tab and choose the printer you’ll use for printing the photos.
Still in the settings menu > Photo tab, define all details related to the photo to be printed:
Display username: defines whether or not to display the user who posted the photo;
Display date: sets whether or not to display the date the photo was posted;
Display caption: defines whether or not the photo caption will be displayed;
Centralize description: centralize the caption below the photo;
Top Margin: defines how far the printed photo should move down, in centimetres (in doubt, no need to change);
Left Margin: defines how far the printed photo should move to the right, in centimetres (in doubt, no need to change);
% Background Increase (H): defines how much the background image height should be increased by a percentage (if in doubt, no need to change);
% Background Increase (W): defines how much the background image width should be increased by a percentage (if in doubt, no need to change);
Printed Photo Format: sets the desired photo format (One 4×6″ photo or two 4×3″ photo);
Photos with different size: if you want to keep the original size of the posted photo (not crop), the captured photo may fall outside the space set for it. If you choose not to keep the original size (crop), the photo will always have the format set to it (please note that most photos on Instagram have a square format). In this case, if the photo is not originally squared, it will be cropped to a square shape.
Use overlay: check if your background image is PNG and the space for the photo is transparent;
Rotate images and text: check this option if you want your photo and text to be rotated 90 degrees clockwise;
Print Preview: this is for previewing how your print will look like without actually printing it;
Restore settings: if you want to restore the original program settings;
Click Import new background and search for an image on your computer (it must be in portrait/vertical mode)
The following items can be moved or resized using the mouse:
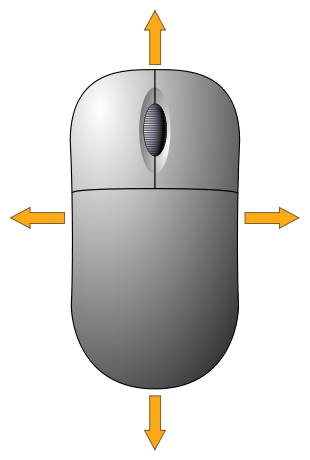 |
In order to move them, left-click on the desired item and drag it to the desired position. To resize them, position the mouse cursor on the edges of the image and when you see arrows, press the left button and zoom in or out as desired. |
Once this is done, click Save and wait for the program to restart. Then:
-
-
- On the main screen, enter a new hashtag (one that preferably doesn’t have as many photos posted, but at least 10). It is not necessary to inform the hash symbol (#). If the hashtag entered already has got images associated to it, the program will ask if you want to use it. Remember that in auto mode all these photos will be printed off (unless you have set a capture start date on the General tab). The hashtag creation occurs automatically at the moment anyone comments with the text #yourhashtag on any post/photo, either old or new);
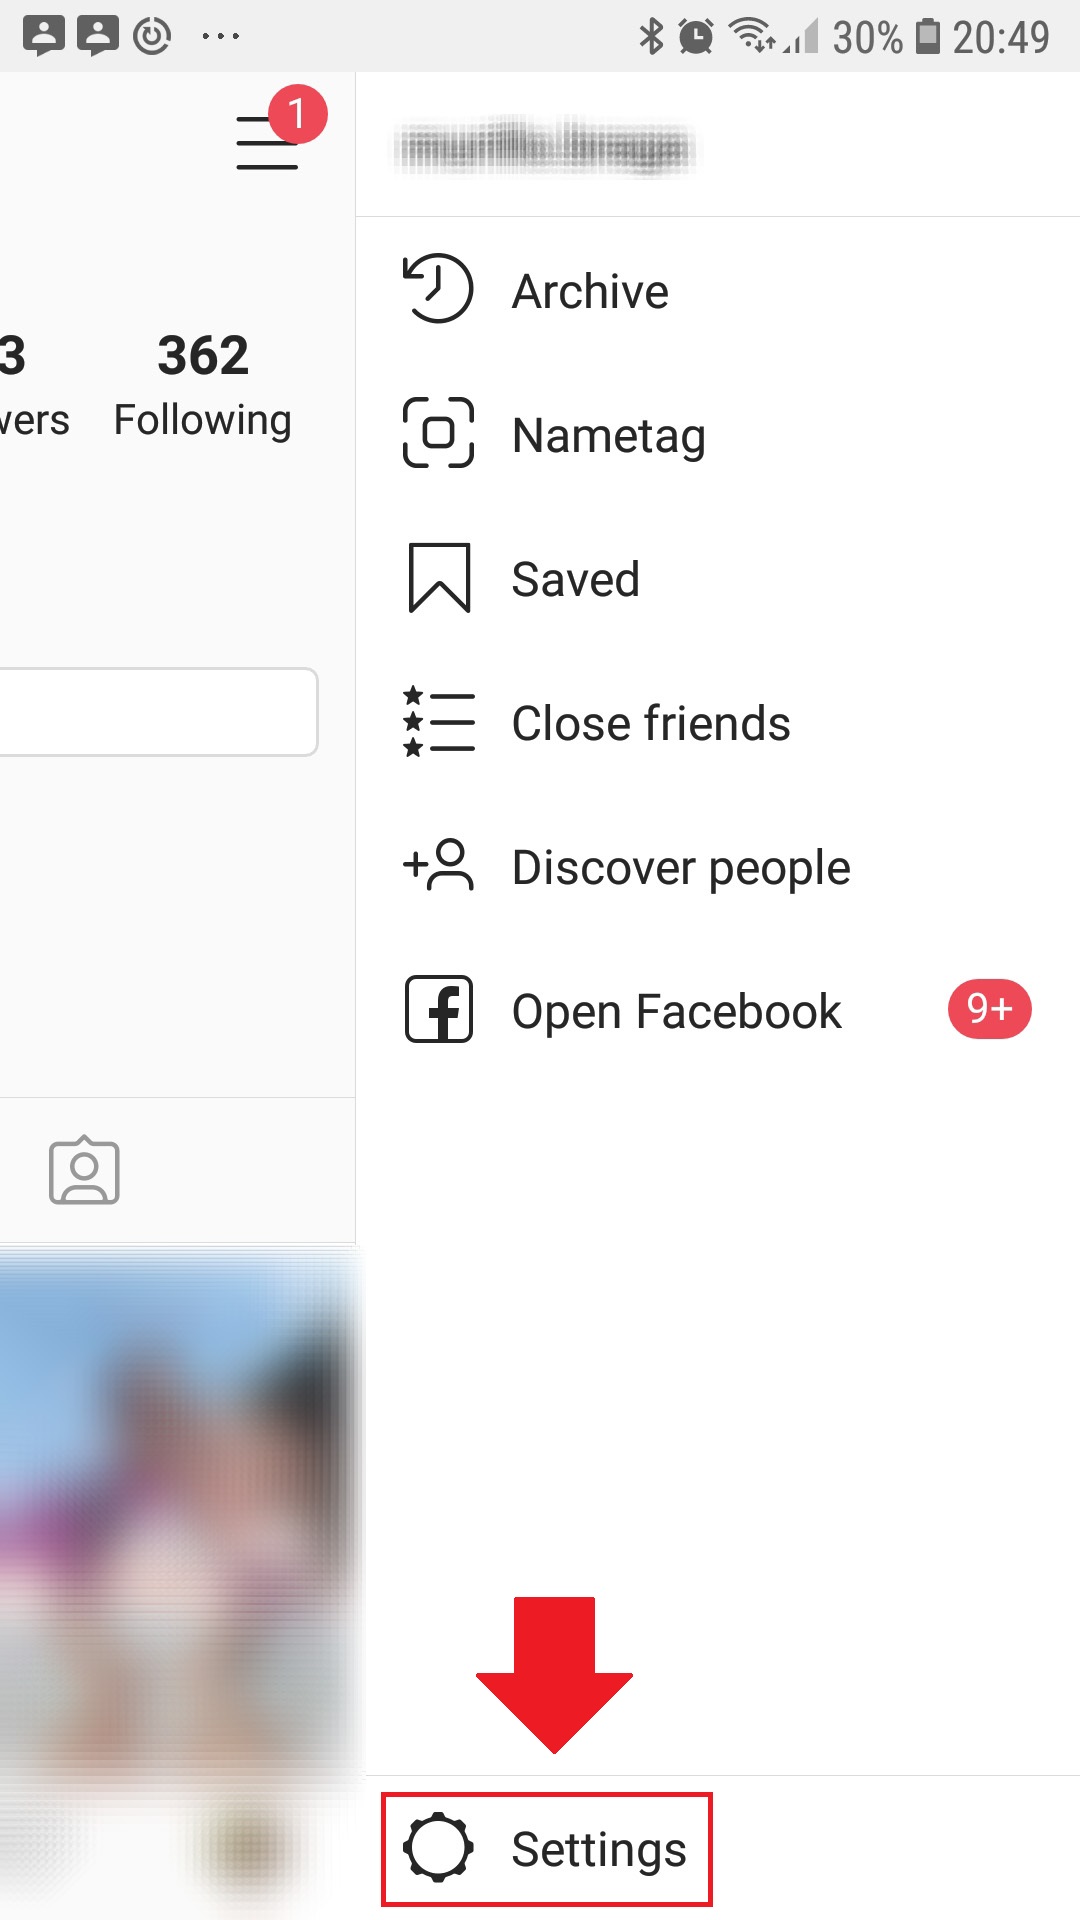
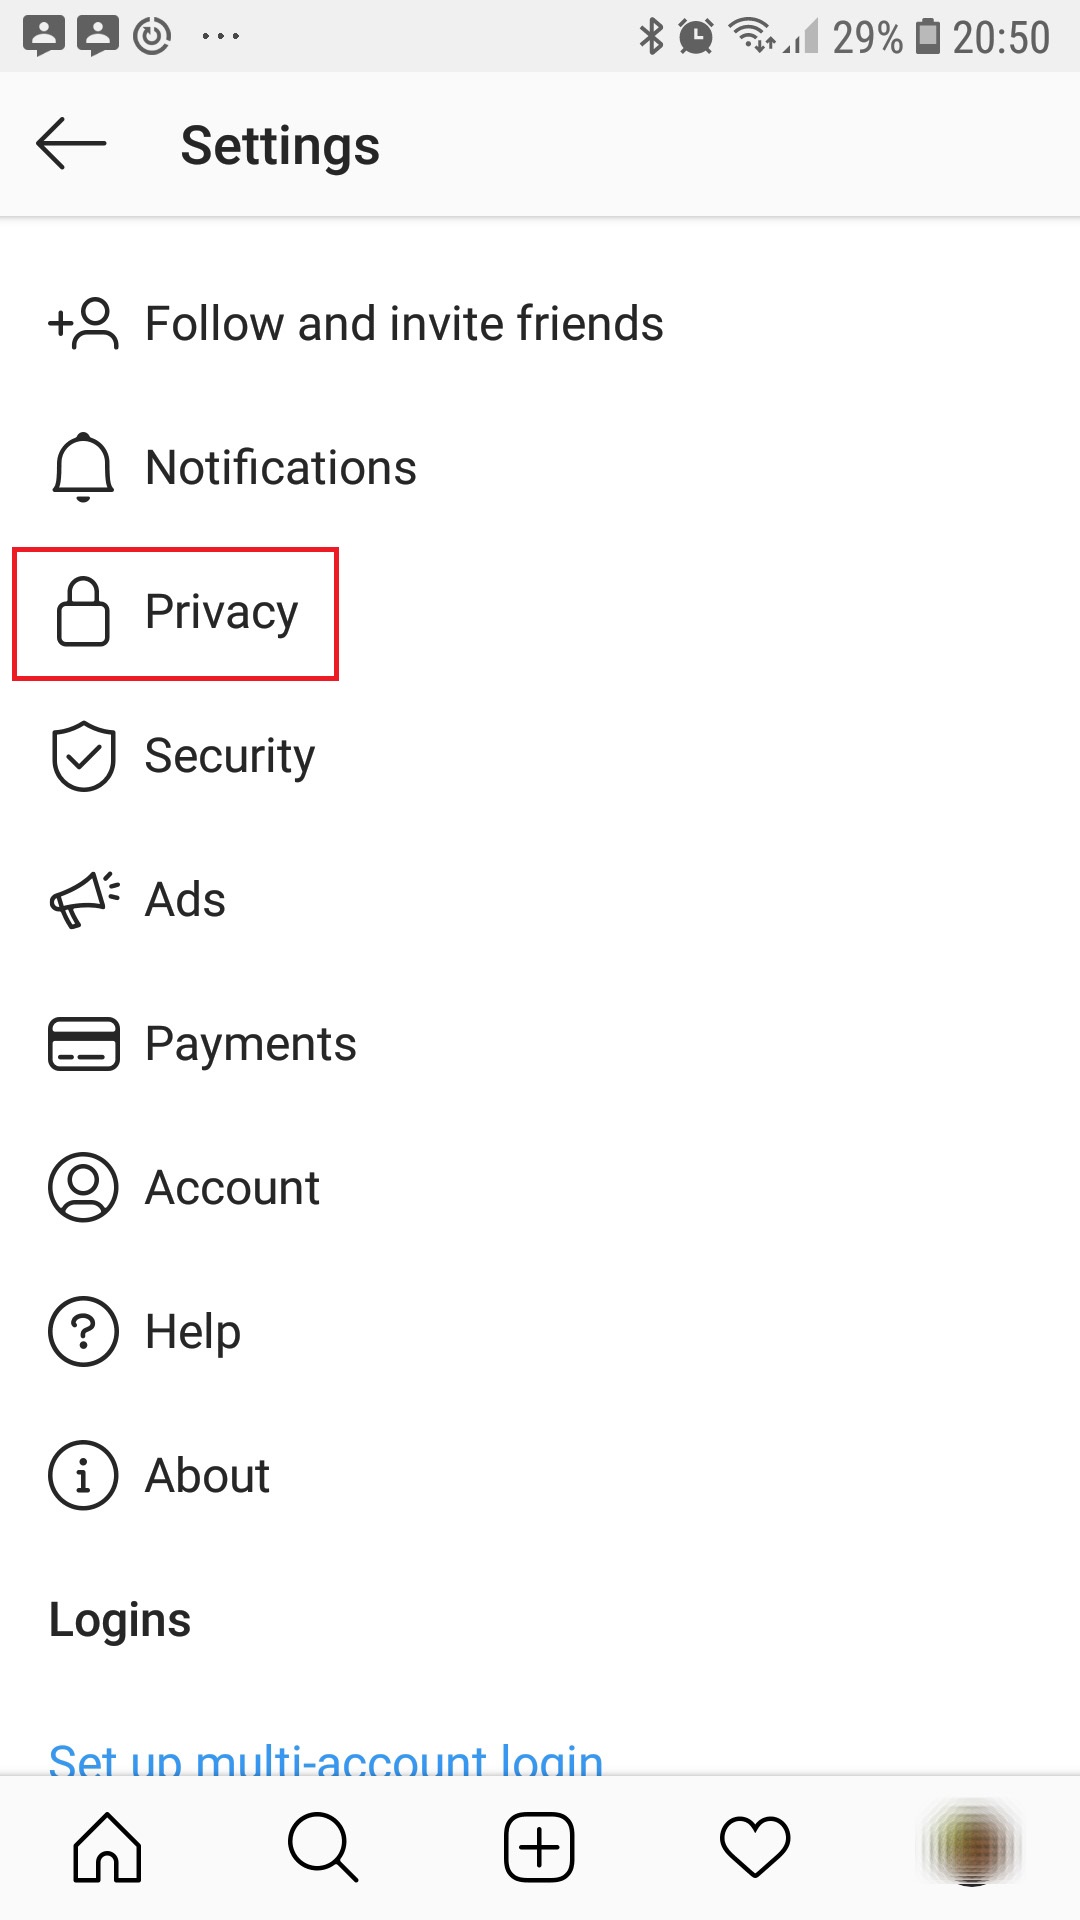
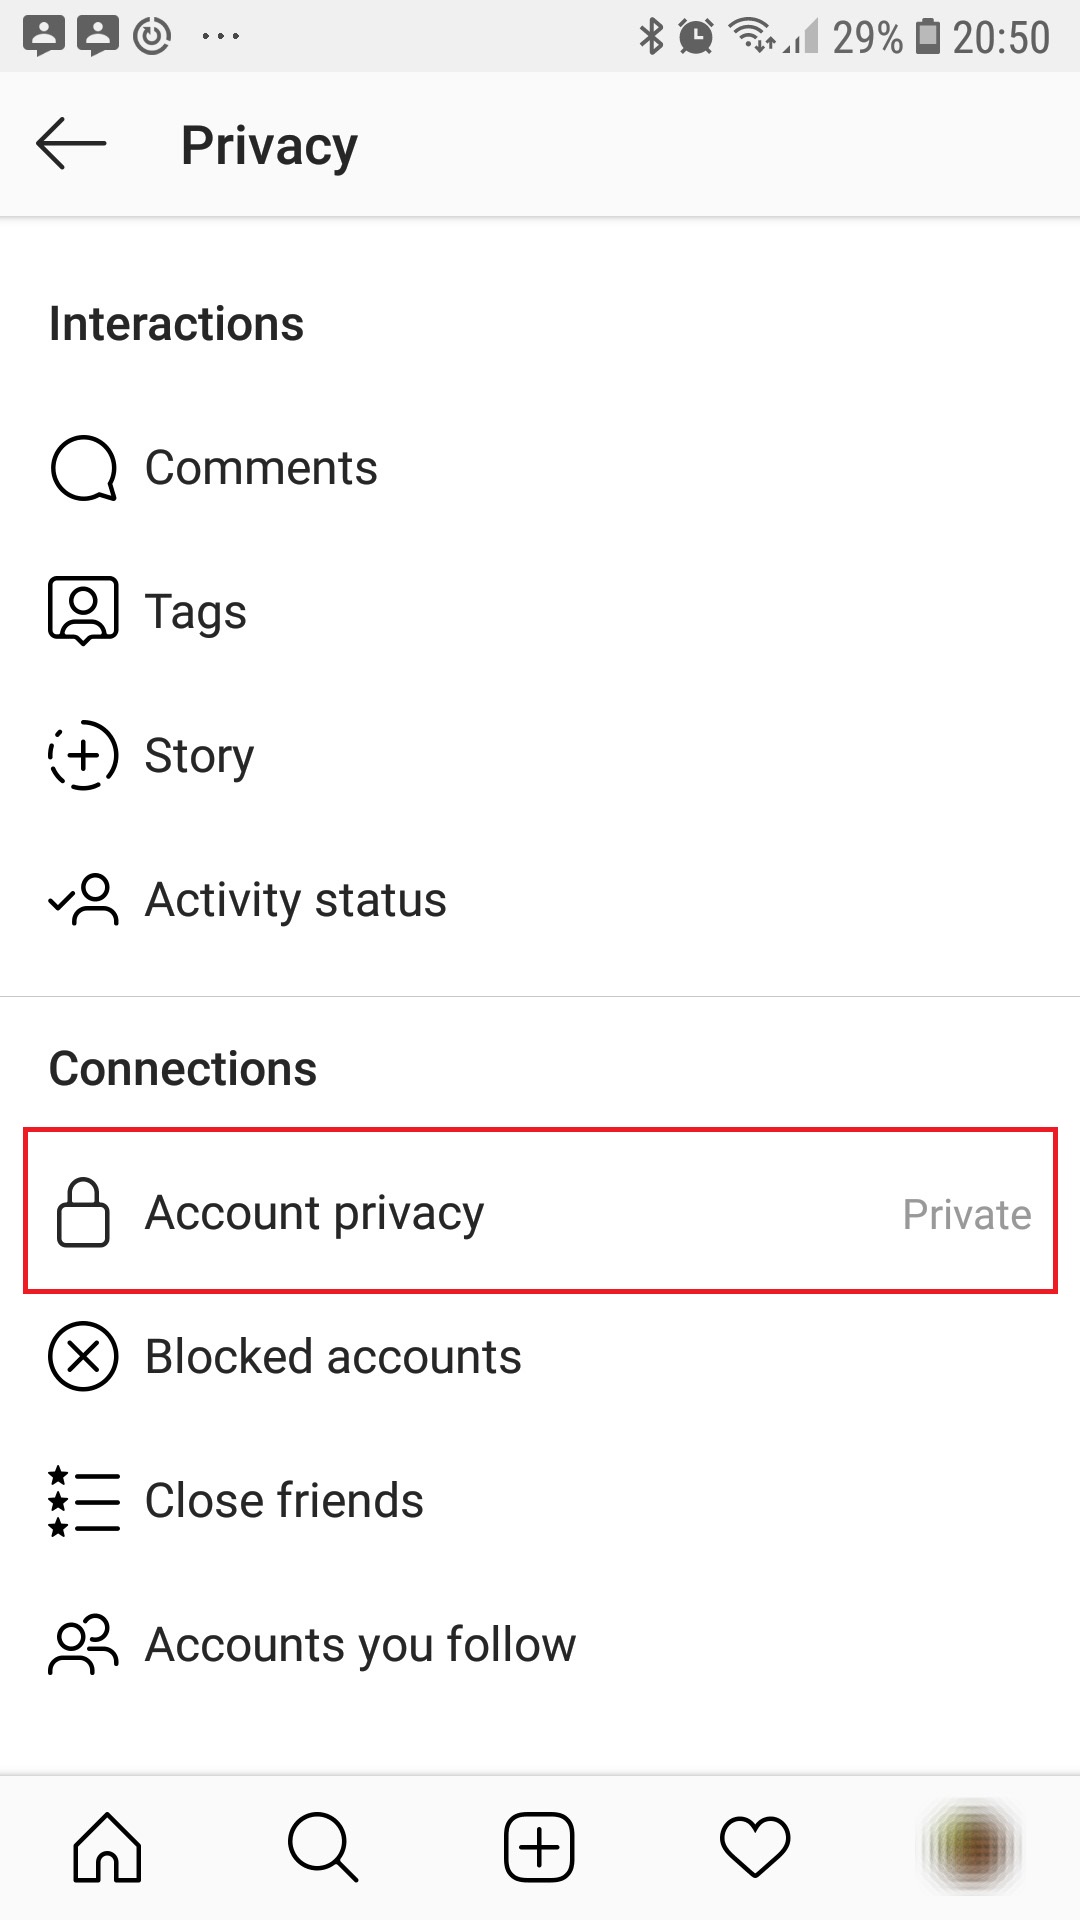
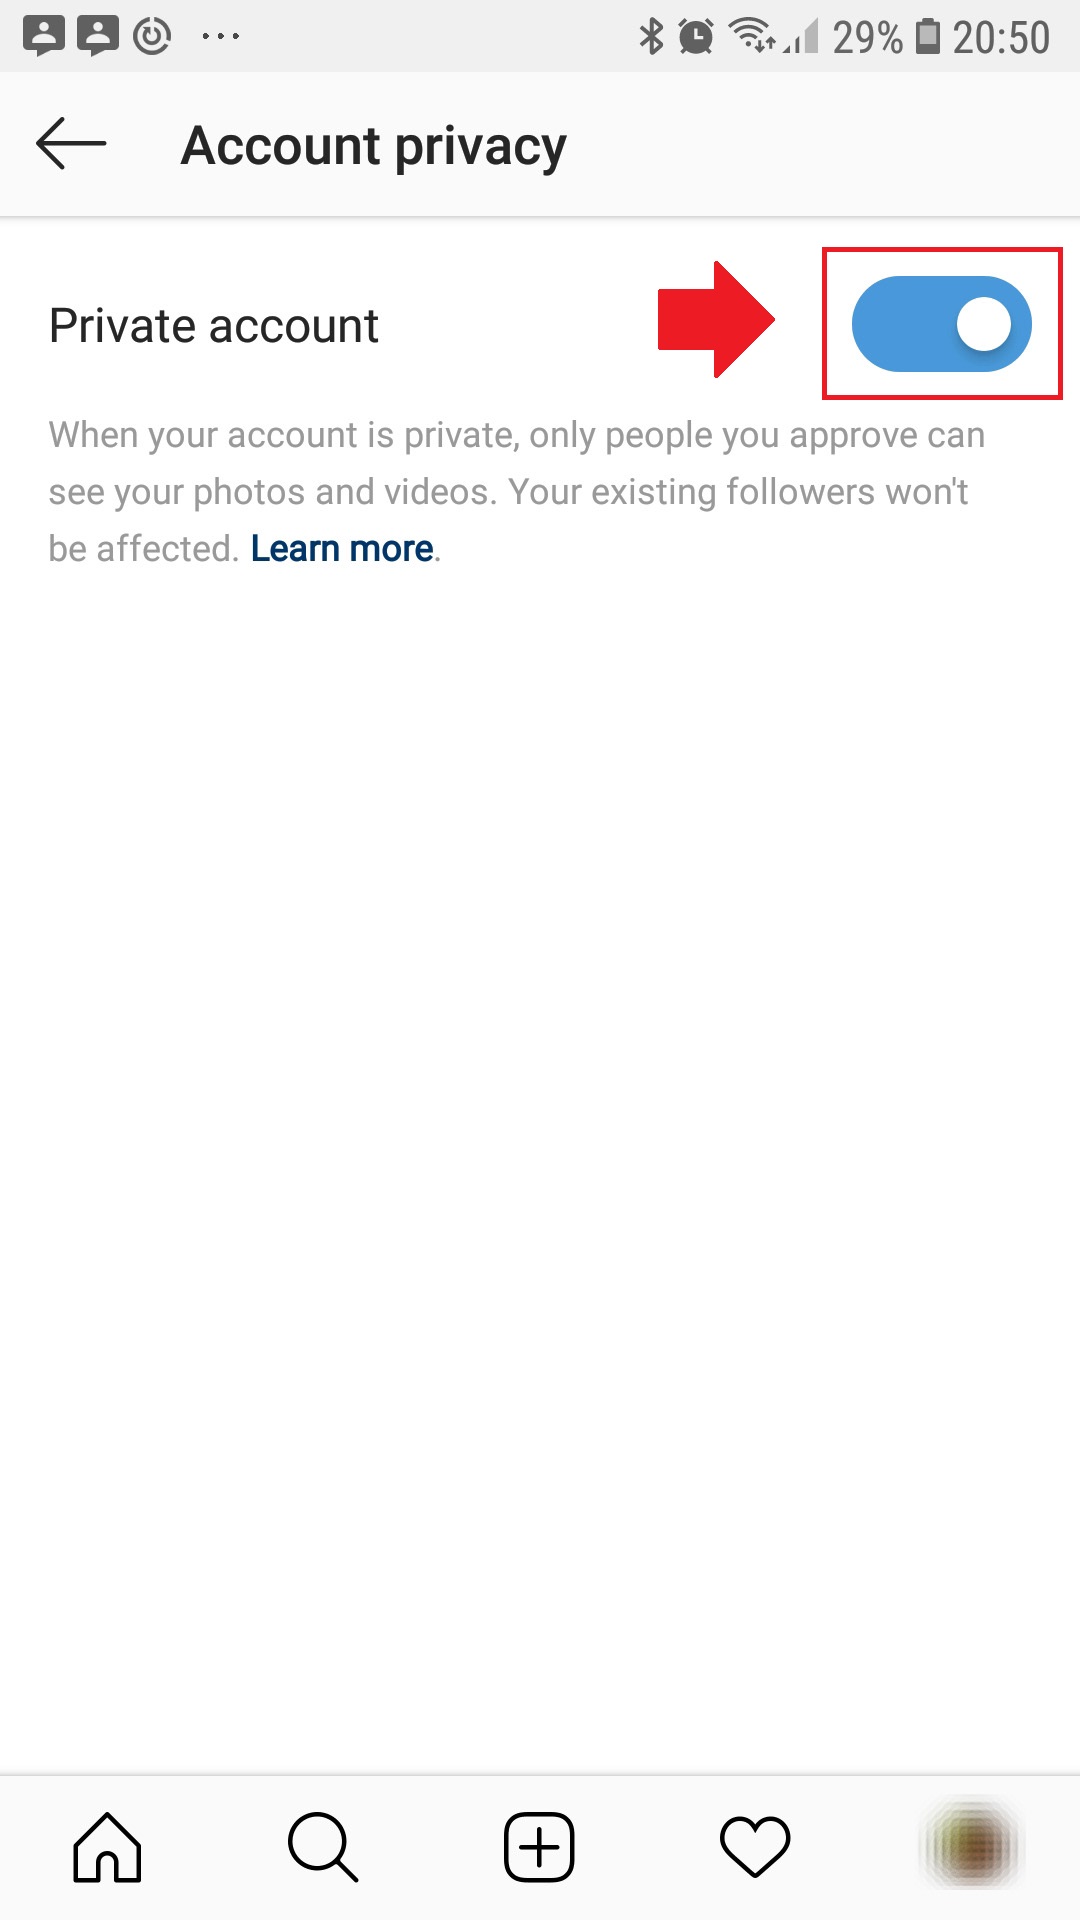
- On your phone, open Instagram, edit your profile, and uncheck the option that says your account is private. This way the program will be able to see and capture the photos you’ve posted.
.
.
.
. - Click on Start. At this point the program will take around 10-15 to open the Mozilla Firefox browser and then start the capture and printing process. As soon as new photos are shared onto the hashtag, the program will pick them up and print them off;
- Post a new photo to your profile or simply use an existing one. Add a comment to it, containing the desired hashtag (e.g.: #peterandmaywedding);
- Wait a few seconds for the photo to be printed. The printing will be done automatically.
-
So for each new photo posted on Instagram with that hashtag, a print will come off the printer.
If you want to pause the process, click Pause.
Ready-to-use template
If you want a ready-made 2x 4×3″ format – as known as the Polaroid style:
- Download here the zip file which contains the background image and the settings file. For the image, import it using Import new background
For the settings file, import it via Import Settings
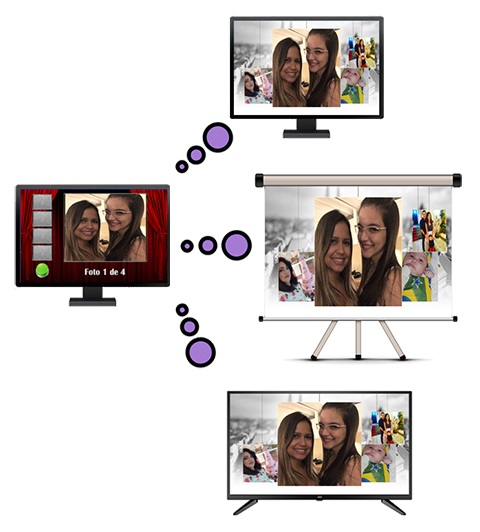
Projecting slideshows on a big screen or TV
See more...
(Applicable to programs: Instagram Hashtag or Photo Booth)
The big screen program needs to be downloaded separately and only works in conjunction with another program – either the Instagram Hashtag or Photo Booth.
How to proceed:
- Make sure you have one of the above programs already installed;
- Also make sure you have taken at least 10 photos so that there are enough images to display in the slideshow;
- This done, download the Big Screen program on this link;
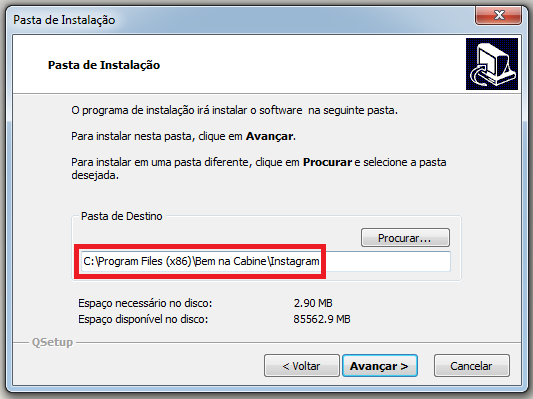
- Unzip it and run the installer. The installation must be done in the same folder of the program in which you want the screen to extract the images:
…
For Instagram Hashtag: C:\Program Files (x86)\Bem na Cabine\Instagram
For the Photo Booth: C:\Program Files (x86)\Bem na Cabine\Photo Booth
- Click Next until you finish the installation;
- A shortcut will be added to your desktop (Telao). Run it;
- When you open it, select which event photos you want displayed on the screen. In this list you will see all events or hashtags created in the program;
- Choose the background image that will appear on the screen by clicking on Change Background Image;
- Click on Start;
- A warning will be displayed. Press OK.
- Then a slideshow will open up and occupy your screen partially. You can drag it to an extended screen (which can be from a monitor, big screen or TV) and then to put it in full screen, press M;
- To exit, press ESC.
You can have your Photo Booth / Instagram Hashtag running along with the Big Screen app, which is being displayed on the extended screen and one won’t disturb the other.
Bulk Printing – How to Use
See more...
- Computer with Windows 7, 8, or 10 operating system and Bulk Printing program installed;
- Printer capable of printing in 10×15 format (paper known as A6 or 4×6 inches);
Once the above conditions are met, on your computer, open the Bulk Printing program.
Ensure that your printer is turned on and set as default in the control panel:
On Windows 8: https://windows.microsoft.com/en-us/windows-8/set-change-your-default-printer or
On Windows 7: https://windows.microsoft.com/en-us/windows7/automatically-switch-default-printers-between-home-work-or-school
Next, make sure the printer is configured to print in 10x15cm (4×6 inches or A6 paper).
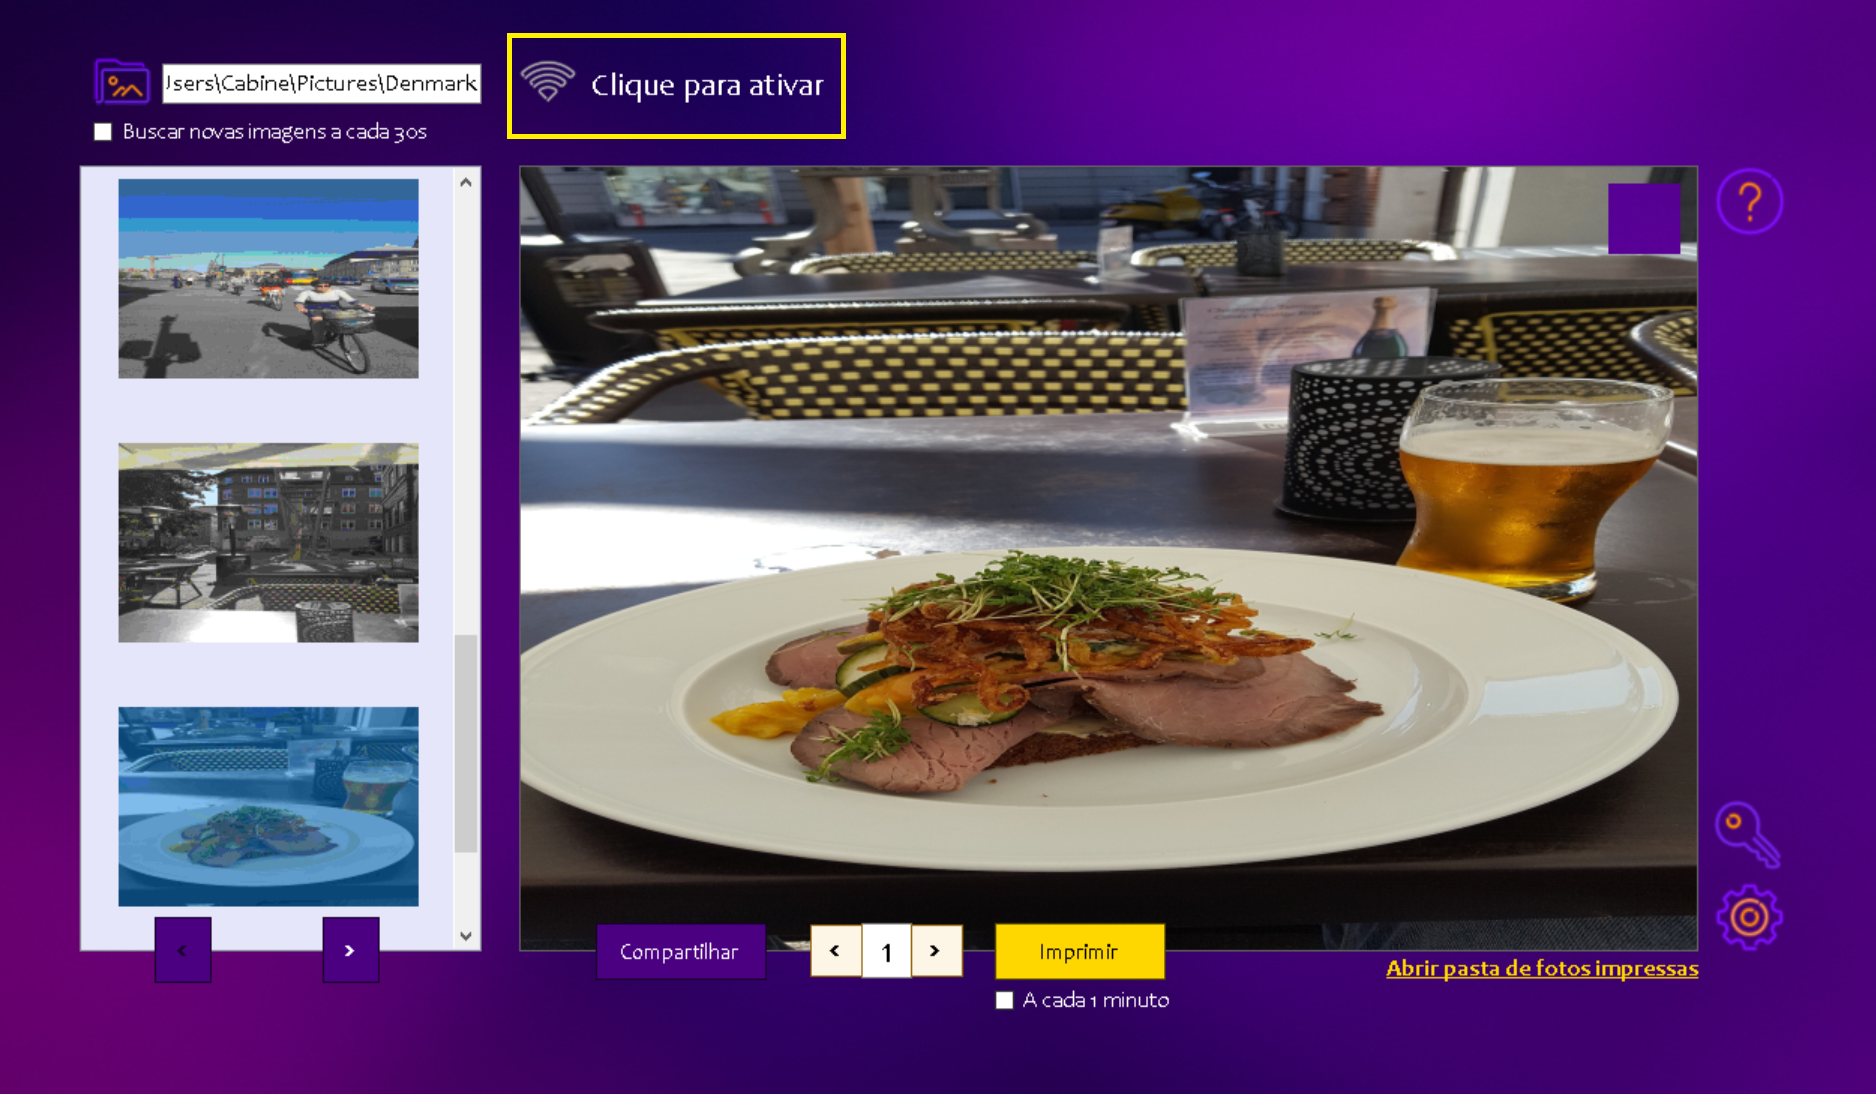
Clicking on the ‘Folder’ field, you should locate the folder where the photos are located. As an initial test, I recommend creating any folder, placing 2 random images inside it, and using it as a reference. Once everything is working, you can go to the folder where all your images are located.
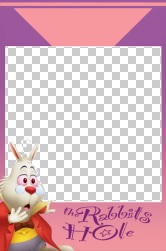
Then go to ‘Change frame’, choose the desired frame, and import a background for it, which can be full or partial. If you want the background image to overlay the captured photo, check the ‘Use Overlay’* option and import a full background
*Overlay is nothing more than the image to be imported overlaying the captured photo. See in this example how the rabbit’s head overlays the image of people:

Click Save. Then click ‘Print’ and wait until the hourglass stops spinning. After that, click on the link Open folder of printed photos, and the system will open a folder with the assembled and printed photos.
Important: The software will print only one image per photo. If you want to reprint any image, choose the Print specific photo option and enter the name of the desired photo/file.
Bulk Printing – Wi-Fi Sending
See more...
The Bulk Printing program offers the function of receiving photos remotely via Wi-Fi, even if this network does not have internet. For example, you can activate the Wi-Fi router on your own mobile device (mobile hotspot), and as soon as the new Wi-Fi network is available, connect your computer to it.
The next step is to enable the Wi-Fi mode in the Bulk Printing program. To do this, click on the icon shown below, in yellow (Click to activate). If the program displays the message “In order to start using this feauture, you need to install IIS. Please visit our website, head to Software > Tutorials, look for the tutorial named ‘Bulk Printing – How to activate the Wi-Fi’ and follow the steps in there” an additional step is required to ensure the Wi-Fi function works correctly.
It will be necessary to first install Internet Information Services (IIS) on Windows 10, following these steps:
- Open the Control Panel:
- Go to the Start menu, type Control Panel, and press Enter
- Enable the IIS feature:
- In the Control Panel, click Programs > Turn Windows features on or off and wait until the list of Windows features is loaded
- Select Internet Information Services (IIS):
- Scroll down until you find Internet Information Services and click the + on the left to expand the options
- Go to World Wide Web Services > Application Development Features and check the following boxes:- ASP.NET 4.8
– .NET Extensibility 4.8
– ISAPI Extensions
– ISAPI Filters - Under .NET Framework 4.8 Advanced Services, click the + to expand and make sure ASP.NET 4.8 is checked
- Complete the installation:
- Click OK and wait for the installation to finish. Windows might need to download some files, so wait until the process is completed. When the success message appears, click OK again and close all open windows
- Verify the Installation:
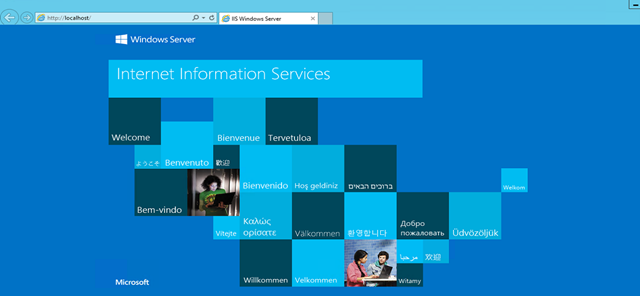
- After the installation is complete, open the browser and type
http://localhostin the address bar. If IIS is installed correctly, you will see the default IIS page.
- After the installation is complete, open the browser and type
After that, go to the Start menu and type cmd. When the Command Prompt program appears, right-click it and select Run as administrator. A black background window will open. Copy the command below, paste it (Ctrl + V), and press Enter:
%windir%\system32\inetsrv\appcmd unlock config -section:system.webServer/modules
Once completed, you will see the message: Unlocked section “system.webServer/modules” at configuration path “MACHINE/WEBROOT/APPHOST”
In the same window, type the command below and press Enter:
iisreset
The following messages will appear:
- Attempting stop…
- Internet services successfully stopped
- Attempting start…
- Internet services successfully restarted
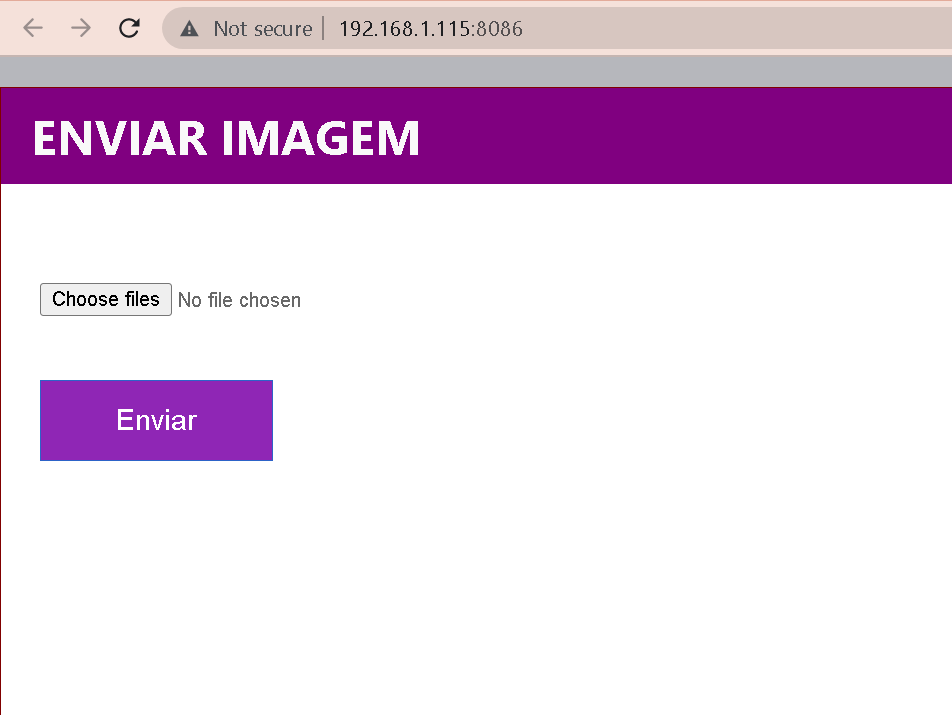
Now, go back to the Foto Maluca program and click again on the option “Click to activate”. The program will automatically generate the address (website) that allows you to upload photos. This site can be accessed by any device connected to the same Wi-Fi network.
Configuring the USB push button
See more...
(Applicable to programs: Magic Mirror or Photo Booth)
The USB pushbutton is nothing more than a cheap alternative to touchscreen monitors. But it is also a more limited option that only allows the user to actually start the photo session by clicking the button. If you want to add more interactions like sharing to email, Whatsapp or Facebook, you need to include a separate keyboard and mouse. With the touchscreen monitor, this is not necessary, everything can be done directly from the screen.
Installing and configuring:
First plug the device into a USB port on your computer. Run the installer to install the program on your system.
Installer: instala_joytokey_374164.exe
Click Next until the installation is complete. Upon completion, the program will run and the icon indicated by the red arrow below will appear in the system icon area of the taskbar.
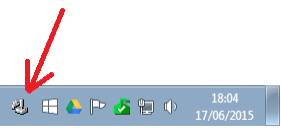
Right-click this icon and then click the Show Window (C) option to access the program configuration.
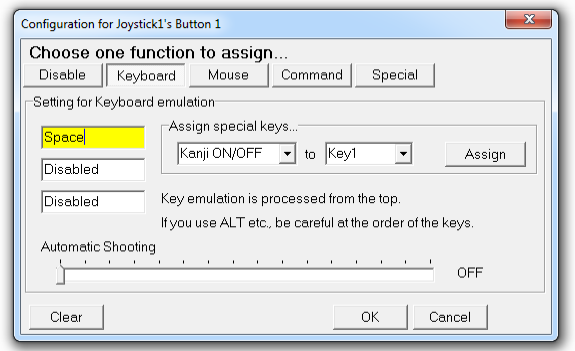
The window below should appear. Select one of the buttons, usually Button 1 , and double-click to access the button options.
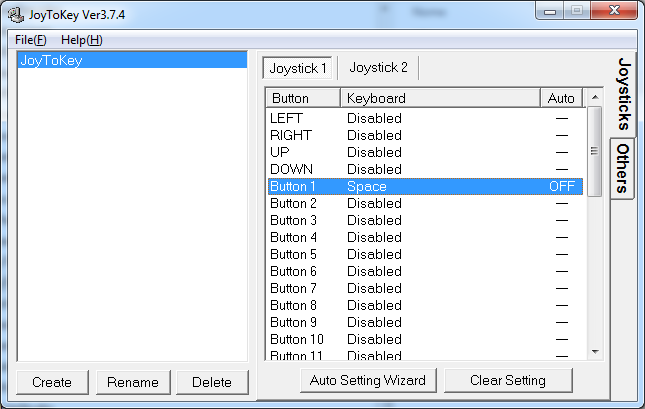
Click the yellow field below and press the key you want to assign to the button. In our case, you must press the ENTER key. Then click OK to confirm the setting.
Click Minimize to hide the program window without closing it. Your pushbutton is now set up. The installer configures the system to automatically run JoyToKey on startup.
Source: Painel Eletronico
Customizing the email delivery service
See more...
(Applicable to programs: Magic Mirror or Photo Booth)
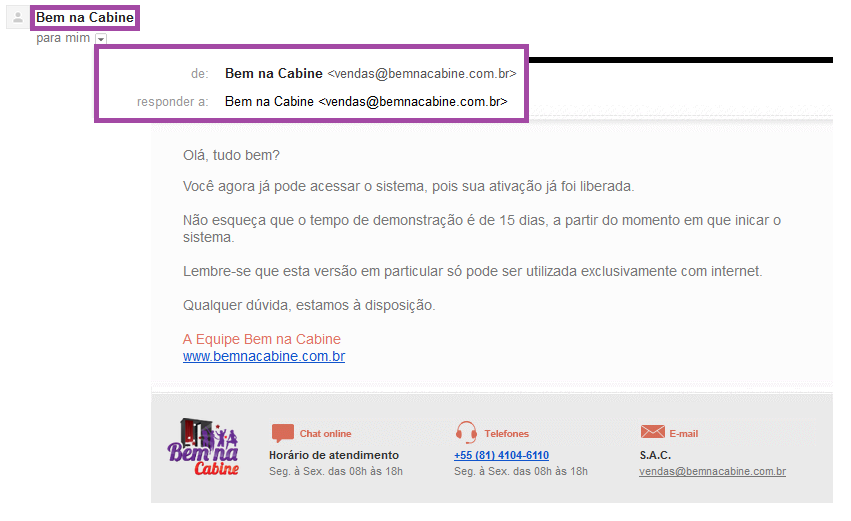
By default, all our programs use Bem na Cabine‘s default server to send everything related to sending emails. For example, in the photo booth program, you enabled emailing photos at the end of the photo session.
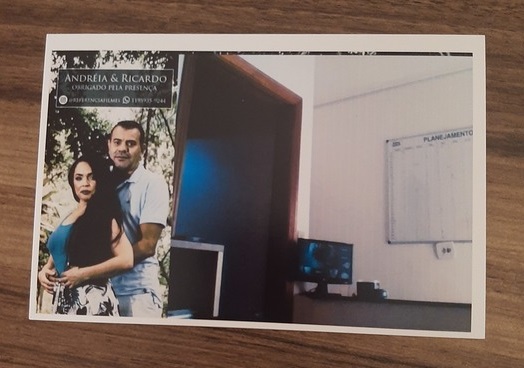
Here’s how the email will appear to your customer:
If you use Gmail:
- First access your email box through the browser. Once you log in, please visit this link
- When opening the screen, check the “Allow less secure applications” option
- Once you check it, it will appear as Allow less secure applications: ON
- Go to the menu Setings > General > Email:
Server: Customize…
SMTP: smtp.gmail.com
Port: 587
Signature: <your name>
Username: <your email address>
Password: <your password>
Check “Use secure connection (SSL)”
If you use Hotmail, Live or Outlook:
- Go to the menu Setings > General > Email:
Server: Customize…
SMTP: smtp.live.com
Port: 587
Signature: <your name>
Username: <your email address>
Password: <your password>
Check “Use secure connection (SSL)”
If your email is from your own domain (for example, mikephotography.com.br), you should contact your domain provider and request the SMTP information from your account and then set it up accordingly;
The other texts can be configured in the Personalization tab.
The RPC server is unavailable
See more...
Printer operation cannot continue due to lack of resources. The print subsystem is unavailable
Solution #1
- Go to Start / Control Panel / Administrative Tools / Services (or in the Start menu, type services.msc and press ENTER);
- Select “Print Spooler”;
- If it says “stopped,” double-click on “Print Spooler” and then click on the “Start” button;
- Check if the “startup type” field is set to “Automatic.” If it’s not, set the Startup Type field to “Automatic”;
- If the service Status is “Stopped,” click Start;
- Click OK to finish.
Solution #2
- Click Start and type:
services.msc
- Then, press ENTER;
- In the list, look for the name “Remote Procedure Call (RPC)”;
- Right-click on it and choose “Properties”;
- Go to the “Recovery” tab and, sequentially for the 1st failure, 2nd failure, etc., choose “Restart the service”;
- Click OK;
- If the service Status is “Stopped,” right-click and choose “Start”.
Restart the computer.
Windows 7 error – File exists
Ver mais...
(Applicable to programs: All)
For Windows 7 users, this is a message that may appear from time to time and whenever it appears, you’ll be blocked from using any of our programs.
This error indicates that the Windows temporary file storage limit has reached its limit.
To free up more space, the procedure is simple: click on the Windows Start button and type Disk Cleanup.
Then select the C: drive and proceed. On the next screen, check only the option “Temporary files” (not to be confused with “Temporary Internet files”) and then click OK. Then click on the Delete files button and wait until it finishes (the screen will just disappear).
Then try to use the desired program again.